630.360.2548

Brake bleeding tips
Brake bleed procedure
1. Installation notes
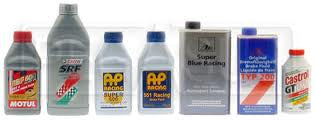
1.1. Use a high performance ethylene glycol based fluid such as Castrol Racing Fluid or, for higher temperature use, Castrol SRF. Do not use silicone brake fluid. Brake fluid is hygroscopic and the boiling point will reduce if it contains any moisture. For optimum performance, fluid should be changed regularly.
1.2. Each Alcon brake caliper has an optimum mounting angle, normally within plus or minus 5° of vertical, to prevent air from being trapped in the piston bores. Check with Alcon’s technical department if the angular position is greater than 5° from vertical.
1.3. Ensure that the master cylinders are firmly fixed to a rigid bulkhead or cross member.
1.4. To avoid trapping air in the master cylinders, ensure that the fluid outlet port is uppermost. Preferably mount the cylinders level or with the push rod end slightly lower.
1.5. Avoid vertical loops in brake lines, which will trap air, particularly in the feed from the reservoir to the master cylinders.
1.6. To prevent a vacuum forming in the reservoir, there must be a breather hole in the cap.
2. Bleeding procedure
2.1. Connect a bleed bottle and tube to each caliper bleed screw and fill the reservoir, leaving the reservoir cap off. Open the bleed screws of each caliper in turn to allow the system to gravity fill, until clean fluid can be seen in each bleed tube. Check that the fluid level in the reservoir does not fall below the outlet opening. Close all bleed screws.
2.2. Where dual master cylinders are used, bleed one front and one rear caliper together. For calipers with two bleed screws, bleed the outer side of the caliper first, followed by the inner side.2.3. Never bleed the system by pumping the pedal until it is firm followed by opening the bleed screws. If there is air in the system, this procedure will aerate the fluid, making removal more difficult.
2.4. Air in the master cylinder primary and secondary chambers should escape to the reservoir via the feed line when the brake is off. If there are any restrictions in the feed line or reservoir connection that prevents air from escaping, air that remains in the feed line will be drawn back into the cylinder on the recuperation stroke. To minimise the restriction, dash 4 hose and fittings should be used for the feed line, particularly if the reservoir outlet is close to the cylinder inlet.
Make it easy. See our pressure bleeders and bottles here:
2.5. Open the outer bleed screw of a front and rear caliper and slowly depress the pedal to avoid fluid aeration, using the full master cylinder stroke. Close the bleed screws and let the pedal return fully to its original position to allow the master cylinder to recuperate fresh fluid from the reservoir. Do not allow the pedal to snap back, use a controlled rate of return. Rest for 5 seconds to allow the master cylinder to re-fill. Top up the reservoir as required. Repeat until no air is visible in the bleed tube. Depending on brake hose runs, a clear tube should be achieved within 3-5 strokes.
2.6. Repeat section 2.5 for the inner bleed screws of the front and rear caliper until no air is visible in the bleed tube.
2.7. Repeat sections 2.5 & 2.6 on the other side of the car.
2.8. Repeat sections 2.5, 2.6 & 2.7 if pedal travel is not satisfactory.
2.9. If the pedal is not firm after repeating the procedure, there must still be air in the system and an alternative procedure, backbleeding, is recommended. Using this method, a large volume of fluid and any air that is trapped in the system is returned to the reservoir via the master cylinder inlet port.
2.10. Fit thin pads, or preferably just pad backplates, to each caliper and slowly pump the pedal so that caliper pistons move forward to contact the pads. Working on one caliper at a time, squeeze the pistons back into the caliper, displacing fluid to the reservoir. The reservoir will fill with displaced fluid so it must be emptied to prevent it from overflowing. Repeat the procedure for each caliper and re-fit the original pads before pressurising the system with the brake pedal.
2.11. After bleeding, check the complete system for leaks before driving the car.
2.12. Recommended bleed screw torque (do not over-tighten bleed screws):
Cold 14Nm Hot: 18Nm
2.13. The aim when bleeding is to achieve a firm pedal that holds its position under a sustained pedal load. Re-bleeding the brakes after some running can further improve the pedal.
2.14. IMPORTANT - When the system is fully bled, the threaded rod of the balance bar should be at right angles to the master cylinder push rods when the normal maximum pedal load is applied.
